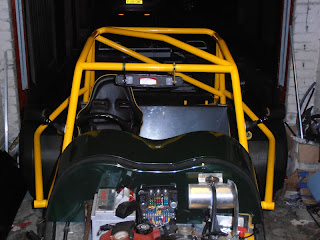
the next job was to try to fit the NACA duct to feed cold air to the intake. this is going to be very tricky as the pannel is curved and the duct is not. so imade a template, masked the pannel, drew around the template and again cut the hole, sanded and polished leaving a nice edge. i will bond the duct in place with a decent adhesive, and will need to slightly fill the gaps where the duct doesnt quite touch the nose! the duct also needs a few coats of clear laquer to give it a shine as its a second hand item which has faded slightly!
Thursday, 27 January 2011
bonnet vent fitment
i recently trated myself to a few bits of carbon fibre to make the build look that bit more special. first i masked the bonnet with decorators tape,then drew around the template which i had made for me.then with a holesaw i made a cut in one corner of the bonnet to allow me to get a jigsaw blade in to it. cut the hole with a brand new blade leaving a nice tidy cutout in the bonnet,in order for the vent to be bonded to the under side of the bonnet! i then sanded down the edge with 2 different fine sand papers and polished the cut edge with black polish to hide the colour of the inside of the gel coat! here is the pics.
Saturday, 22 January 2011
top and bottom rad hoses
i have also managed to do the top and bottom radiator hoses although the bottom hose still needs a tee into the header tank. the outlets on the radiator are 38mm and the hoses from the car are 32mm so i bought a 38-32 reducer and a 32mm aluminium hose joiner. the 38 mm hose clips were fit but the 32's are still in the post. they will be done next weekend! and the T-peice will be done in the bottom hose also. another small job i did was to link out the heater hoses as im not opting for a heater.
rear view and wing mirrors
i have fitted a longacre racing rear veiw mirror to the roll cage and also some suzuki gsxr e-marked wing mirrors.
the lonacre mirror just bolted straight to the cage via its own mounting brackets but the wing mirrors needed tapping to the cage and bolting with m6 bolts.i also added some tigerseal between the mirror mounting brackets and the cage to stop the metals rubbing and adding some extra strength
remote oil filter fitment
as the original oil filter fouled the steering shaft, i had to buy a mocal remote filter kit, i made a bracket from 3mm alloy and bolted it to a pannel which was welded to the chassis. i fit the take off plate to the original filter outlet and connected the aeroquip hoses as per instructions. these are very good hoses and are a very tight fit. first you have to put the hose ends into boiling water to slightly slacken the hose ends. then quickly push the hose ends onto the outlets. once they cool down they seal very tight so i will be anxiously awaiting the results once the oil systam is pressurised!
i have also upgraded the oil lines to hel performance braided with adonised fittings
Friday, 14 January 2011
wiring diagrams for the s2000 engine
the wiring was one of the next things i had to work on so i found these on the s2000 forums. my ecu will control ignition and fuelling so loads of the orignal harness can be stripped of all un necessaary wires. and believe me there is thousands to remove as the loom is extremely complex! a big thanks must go to MB from the honda forum for finding these for me.
Saturday, 8 January 2011
lower harness mount fitting
i purchased some lower harness mounting plates and some eyebolts to fasten to the mounting plates which are welded to the chassis. i had to slightly trim the mounting plates to fit the mnr plates. once in place i had to drill holes through the mnr plates so the eye bolts could pass through and tighten up to the plates via there pre welded on bolts.these are a great solution for a strong lower harness mount!
Subscribe to:
Posts (Atom)